Initial Procore + Breadcrumb Integration (Automatic Project Sync)
A guide for Procore Administrators setting up the Breadcrumb Integration using the Automatic Project Sync.
The Breadcrumb and Procore integration allows you to automatically sync your Projects, Companies and Users from Procore into Breadcrumb, and send all Documents and Worker Activity back to the Site Diary in Procore. This guide will show you step-by-step how to set up that integration.
Table of Contents
- Requirements
- Install Breadcrumb via the Procore Marketplace
- Create a Permissions Template for Breadcrumb
- Apply the Permissions Template to All Projects
- Activate the Integration in Breadcrumb
Requirements 🔑
Breadcrumb Permissions: Company Host Permissions required. If you do not have access, please contact your Breadcrumb administrator.
Procore Permissions: Admin Permissions required. If you do not have access, please contact your Procore administrator.
Subscription: An enterprise Procore subscription is required.
Install Breadcrumb via Procore Marketplace
- Log in to your Procore account.
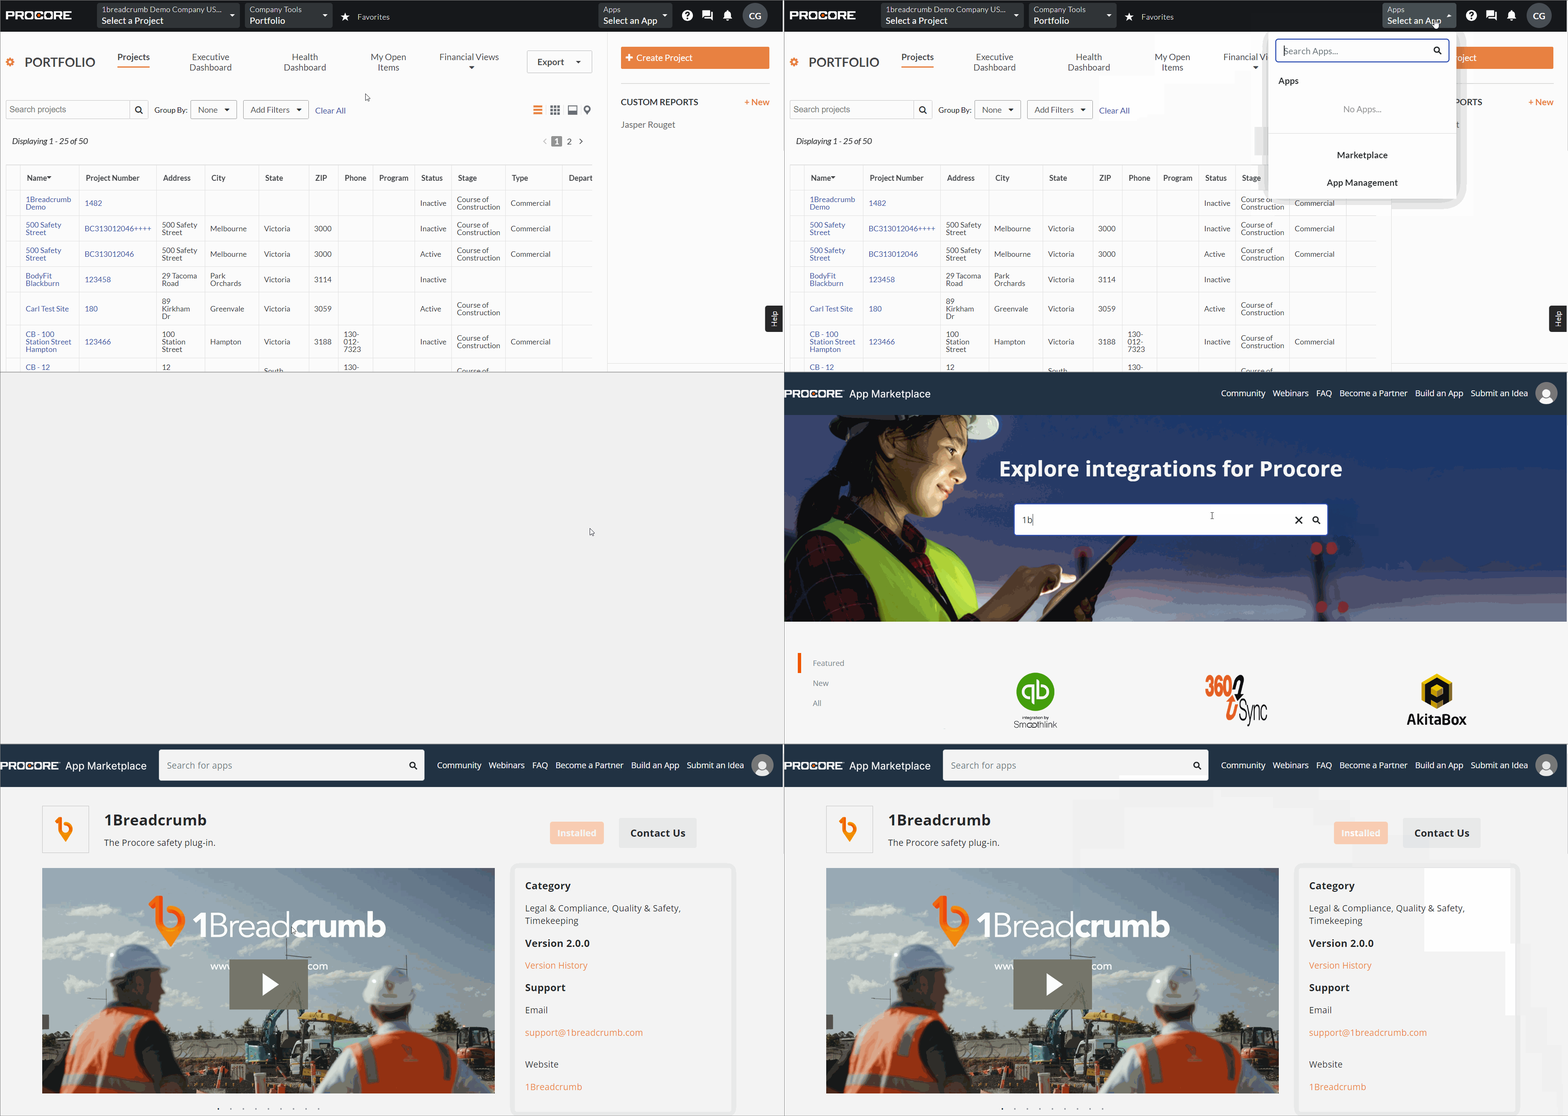
- Navigate to the Procore app store by selecting Apps > Select an App located in the top right-hand corner of the header, then select Marketplace from the dropdown menu.
- On the new page, use the search bar to look for Breadcrumb.
- Select the Breadcrumb tile from the search results.
- Select the Install App icon located above the Breadcrumb details window.
- Confirm the installation in the pop-up window by selecting Install.

Create a Permissions Template for Breadcrumb
- Return to your Procore Homepage.
- Navigate to the Company Tools dropdown list located in the header.
- Select Permissions from the dropdown menu.
- Select the Project Permissions Templates tab from the permission files banner.
- Create a new permissions template by selecting the Create Project Permissions Template toggle and choose Project (Global) - Assignable to All Projects from the dropdown menu.
- Name the global permission template Breadcrumb Projects Permission Template or a similar name, then select Confirm.

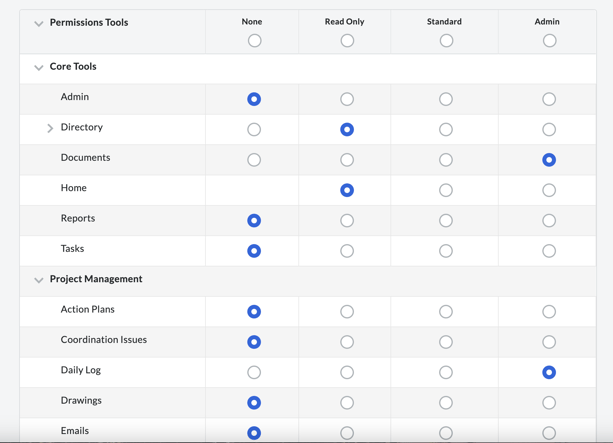
7. In the new window, ensure the following Permission Tools/Core Tools have the below-specified permissions enabled:
-
- The below categories should have the Read Only column enabled:
- Directory/Portfolio: Also select Turn ALL ON from the Directory/Portfolio dropdown list. This is to pull over the projects and project directory.
- Documents: Syncs records created in Breadcrumb to the relevant projects' Document tool in Procore.
- Timecards/Site Diary/Daily Log: Syncs Breadcrumb Site Attendance records to the relevant projects' Site Diary/Timecard tool in Procore.

8. For all other Permission Tools/Core Tools settings, set them to None. - The below categories should have the Read Only column enabled:
- 9. Select Save after making the above changes.
Apply the Permissions Template to All Projects
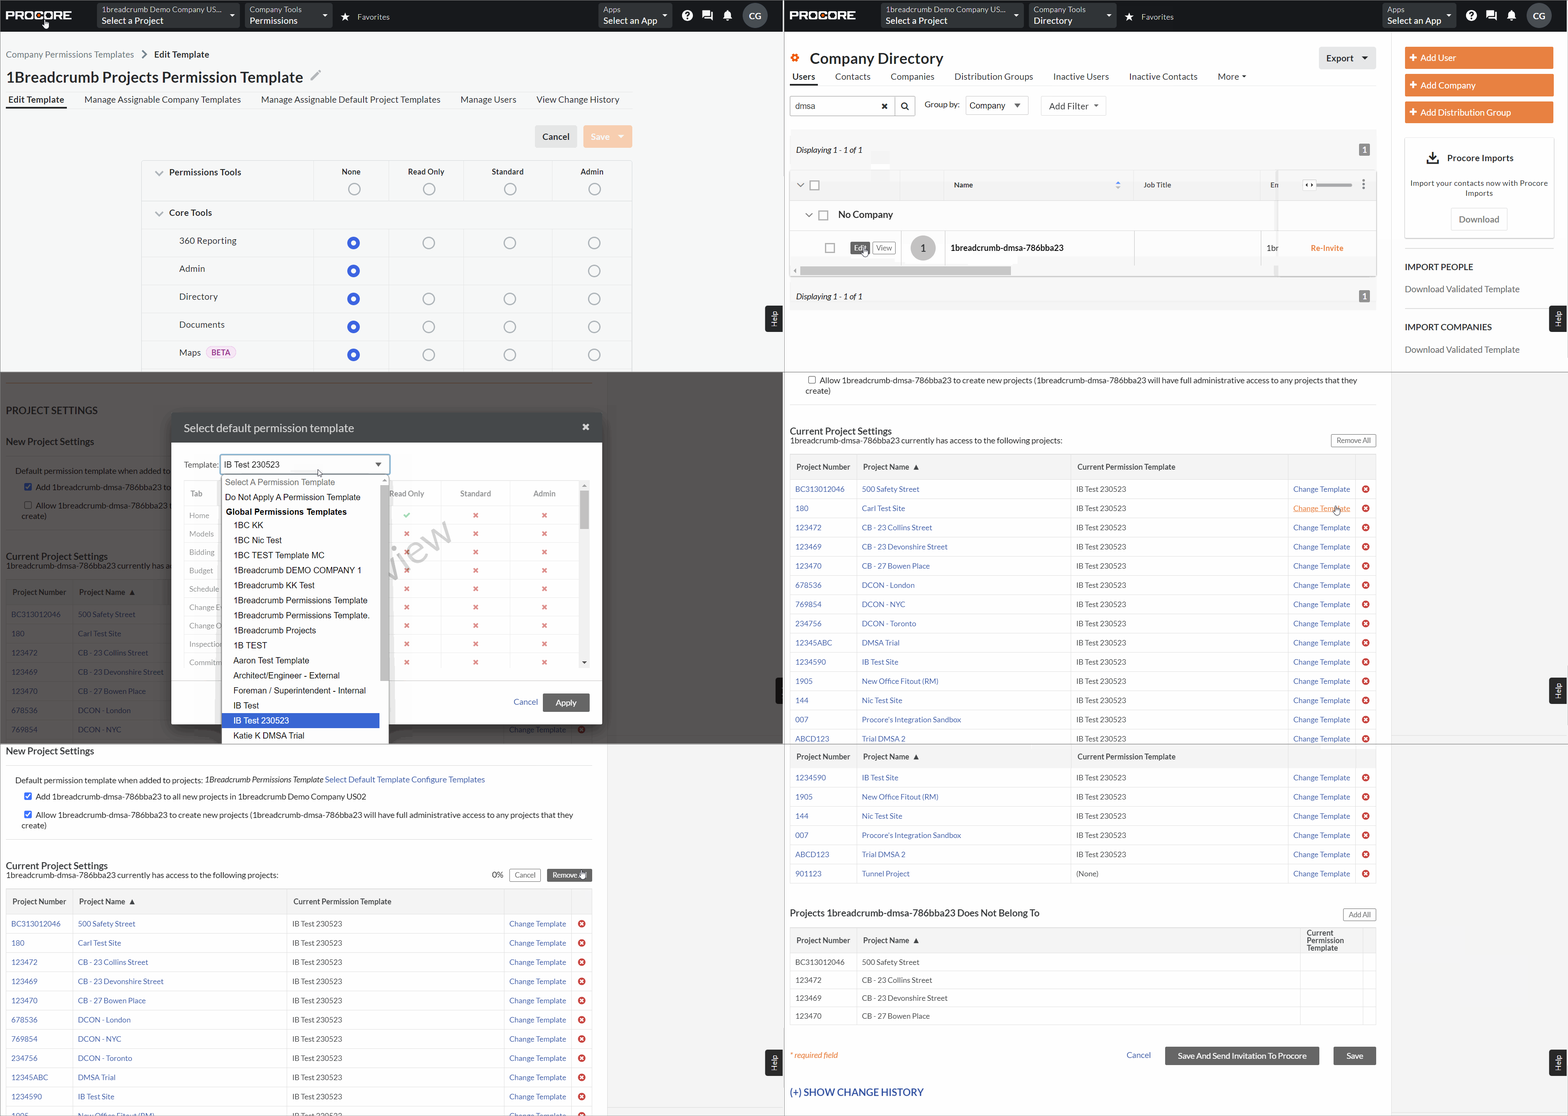
- Return to your Procore Homepage by selecting the Home button or Procore banner (top left).
- Navigate to the Company Tools dropdown list located in the header.
- Select Directory from the dropdown menu.
- In the search bar, please type in "dmsa" and hit enter.
- Beside '1breadcrumb-dmsa-786bba23’ select Edit.
- Scroll down to Project Settings/New Project Settings and select on the following Select Default Template hyperlink.
- In the pop-up window, from the Templates drop down list, pick the template you made in Part 2, Step 6, and select Apply.
- Check the two boxes below this:
Add '1breadcrumb-dmsa-786bba23' to all new projects in "Default permission template" and;
Allow 1breadcrumb-dmsa-786bba23 to create new projects (1breadcrumb-dmsa-786bba23 will have full administrative access to any projects that they create) - In the Current Project Settings section under, select Remove All located above the list of Current Project Settings table. The list of current projects will be moved into the Projects 1breadcrumb-dmsa-786bba23 Does Not Belong To table.
- Select the Add All button located above the Projects 1breadcrumb-dmsa-786bba23 Does Not Belong To table. This will now add all the projects into the Current Project Settings table. Note: depending project count, this may take several minutes.
- Select Save.

Note: Site Diary Integration settings with Procore (Only required if you’ve made custom fields mandatory in Procore)
To ensure your Site Diary (Daily Log) integration between Breadcrumb and Procore works smoothly, you’ll need to check that there are no required fields in your custom fieldsets. Procore doesn’t allow submissions via the API if mandatory fields are left empty, which can block the sync from working properly.
Steps to Remove Mandatory Fields in Procore:
-
Log into Procore and navigate to: Company Tools > Core Tools > Admin
-
On the right-hand panel, scroll to Tool Settings and click on Daily Log (or Site Diary).
-
In the top-left corner, click on Fieldsets (or Custom Fields).
-
If any custom fieldsets are in use, you’ll see them listed here. Locate the one associated with your projects and click Edit.
-
In the edit view, look at the right-hand side of each field.
Untick the checkbox under “Required” for any fields that don’t need to be mandatory- like Comments, Location, or Weather etc. -
Click Save once you’ve made your changes.
Activate the Integration in Breadcrumb
With Procore now permitted to integrate with Breadcrumb and the integration settings configured, proceed to activate the integration within your Breadcrumb portal
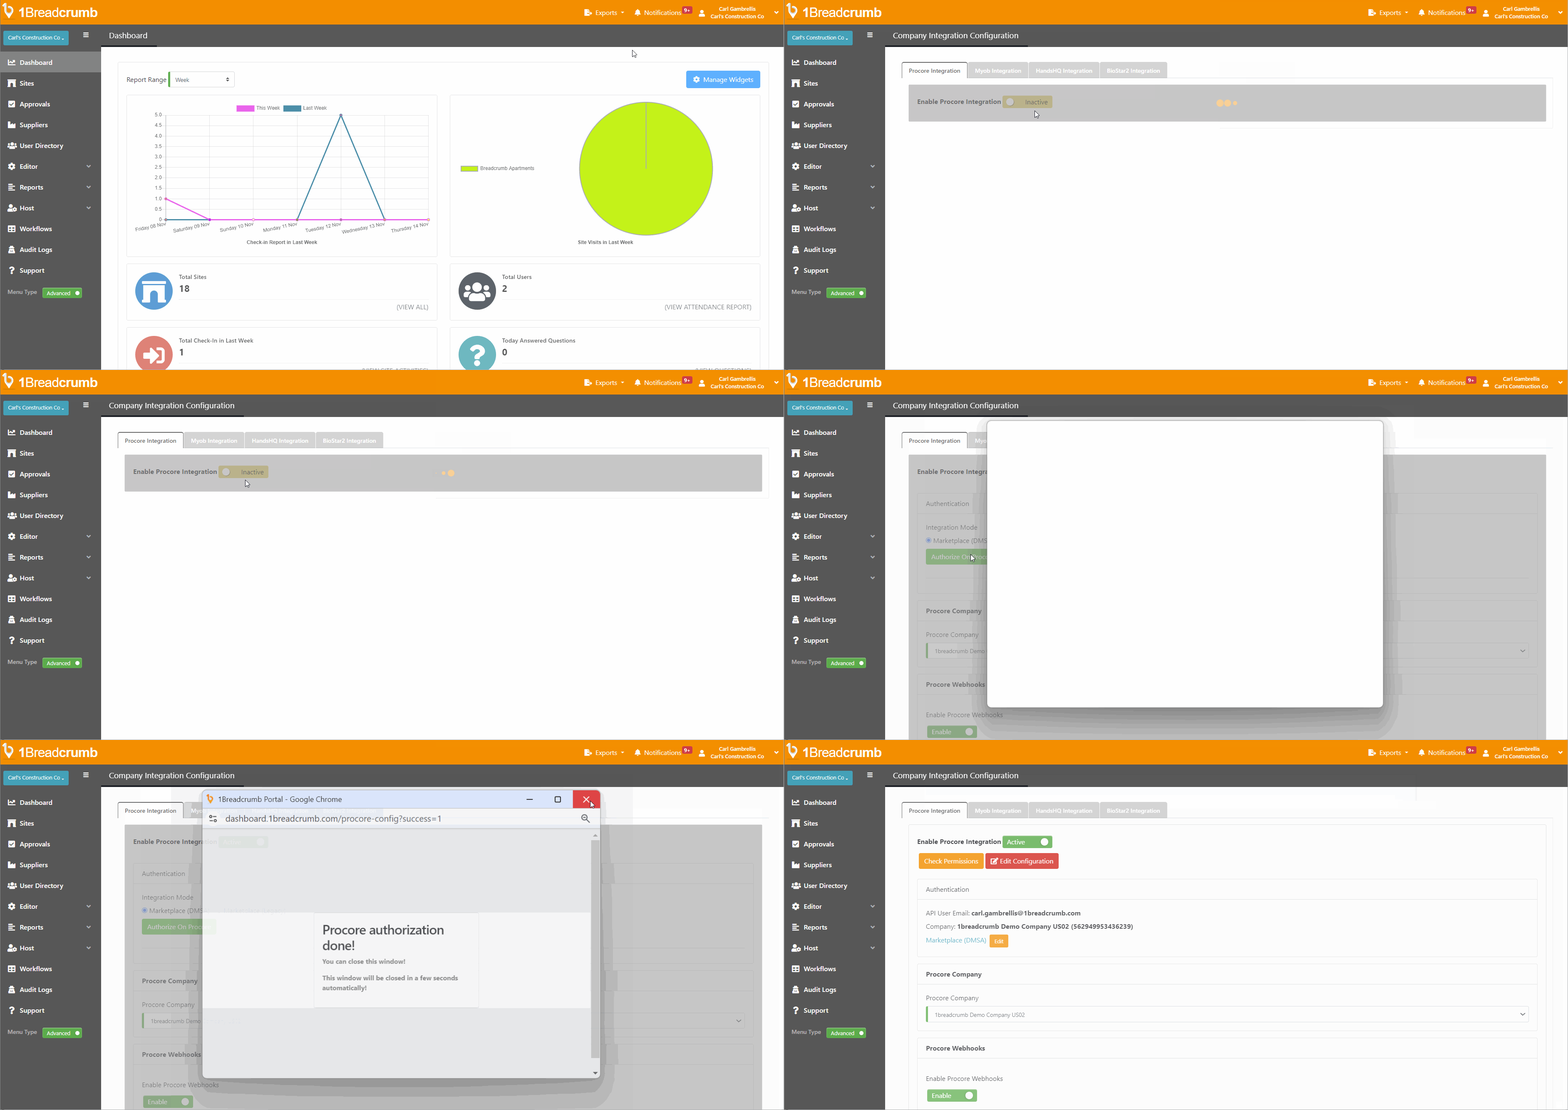
- Log into your Breadcrumb account here using your verified mobile number.
- Navigate to the company configuration settings by selecting on [Your Name / Company Name] located in the top right hand corner within the orange header.
- Select Integration from the drop down menu.
- Switch the integration to Active.
- Pick Marketplace (DMSA) from Integration Mode and select Authorize on Procore.
- Please reach out to your CSM at this point to ensure you are enabling the correct settings.
